Here I will teach you, or at least try to, how to do different techniques with icing, fondant, gum paste, marzipan, and other things. As i learn to do this stuff, so will you.
How to Make a Basket Weave:
All you have to do is pipe lines vertically on the cake with a good amount of space in between them. Then you just pipe lines horizontally over the vertical lines to the crease between the two bordering lines and you continue to do this in an alternating pattern to create the illusion that the icing was woven.
This picture and technique can also be found on the first blog post called "First" posted on Saturday, June 18,2011.
Making Cake Designs:
When making cake designs its a good idea to sketch it out first. I know it might seem like a no brainier but it's very good advice. If you want the bottom layer of icing to be smooth then you might consider dipping the icing knife in water first. Just some general advice for you.
Piping Tips:
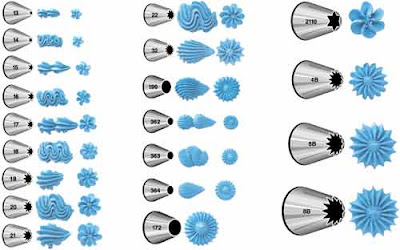
While searching for directions on how to do different piping borders I stumbled across these handy dandy charts showing the different designs that come out of tips so that instead of testing the the tips out of a plate like I always do, you will already know what designs will come out of the tip.
How to Make a Shell Border:
To begin, you will select your tip. Most commonly used is #18 or similar but you may use any tip you please. You will begin by piping a dot, then while allowing the icing to continue to be pushed out of the piping bag bring it up and then down the other side of the dot in a "J" shape. Begin the next shell at the thin point of the one before it and repeat the process all around the cake. When you reach the last shell tuck the tail (thin part) under the body (bulky part) of the first shell.
(#18 Tip)
How to Make a Bead (Pearl) Border:
If you want something simple and elegant or don't quite feel up to the shell or reverse shell borders, you can always fall back on a simple bead/pearl border. You simply select a round, star or whatever shape you want tip of the size bead you want then squeeze the bag until a ball of icing the size you want has formed. Easy, simple, elegant, no worries.


